
ansible自动化部署haproxy+http负载均衡
如果不利用ansible自动化部署工具,其部署繁琐程度可通过点击这里查看这里我们通过ansible 进行部署,只需要熟悉playbook书写相关规则:[root@server1 ansible]# cat hosts[test]server2[prod]server3[webserver:children]testprod[lb]server1[root@server1 ansible]# cat
·
如果不利用ansible自动化部署工具,其部署繁琐程度可通过点击这里查看
| server1 | 172.25.254.189 | 轮询控制端 |
|---|---|---|
| server2 | 172.25.254.188 | 轮询端 |
| server3 | 172.25.254.187 | 轮询端 |
| 客户端 | 17225.254.89 | 测试 |
这里我们通过ansible 进行部署,只需要熟悉playbook书写相关规则:
[root@server1 ansible]# cat hosts
[test]
server2

[prod]
server3

[webserver:children]
test
prod

[lb]
server1
[root@server1 ansible]# cat ansible.cfg
[defaults]
inventory      = ./hosts
[privilege_escalation]
become=True
become_method=sudo
become_user=root
become_ask_pass=False
部署apache:
[root@server1 ansible]# cat playbook1.yml
---
- hosts: webserver    ###在server2、server3主机上安装部署apache
  tasks:
  - name: install the latest version of Apache from the testing repo
    dnf:
      name: httpd
      state: present
  - name: add index.html
    copy:
      content: "{{ ansible_hostname }}"  ##将登陆的主机名字写入两个轮询主机发布目录中。
      dest: /var/www/html/index.html

  - name: start apache
    service:
      name: httpd
      state: started
      enabled: yes
  - name: add http to firewalld
    firewalld:
      service: http
      permanent: yes
      state: enabled
      immediate: yes
- import_playbook: haproxy.yml
部署haproxy:
[root@server1 ansible]# cat haproxy.yml
---
- hosts: lb    ##在调度主机上安装haproxy服务。
  tasks:
  - name: install haproxy
    dnf:
      name: haproxy
      state: present

  - name: configure haproxy    ##更改该目录下的haproxy.cfg文件,将与/etc/haproxy/haproxy.cfg进行对比,若发生更改就将其同步,并触发restart haproxy任务。
    template:
      src: haproxy.cfg
      dest: /etc/haproxy/haproxy.cfg
    notify: restart haproxy

  - name: start haproxy
    service:
      name: haproxy
      state: started

  - name: accept haproxy
    firewalld:
      service: http
      permanent: yes
      immediate: yes
      state: enabled

  handlers:
  - name: restart haproxy
    service:
      name: haproxy
      state: restarted
[root@server1 ansible]# cat haproxy.cfg
定义调度的端口: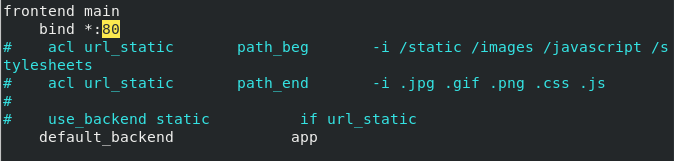
将需要调度的主机写进配置文件:
在客户机端测试:
我们发现在server2和server3之间进行轮询切换。
更多推荐


 0
0 0
0- 0


 已为社区贡献1条内容

所有评论(0)